Communication Breakdown
In this article we are going to take a look at the Week 4 match between TSM and Echo Fox, looking at the breakdown in communication specifically for TSM in Game 1 of the series. Before we begin, if you haven’t done so go and watch the game, I recommend muting the video so that you only leave with your own perspective on what happened rather than how the casters saw things unfold. When watching the video try to look for where you think communication on the side of TSM breaks down, and if you think I’ve missed anything please let me know in the comments at the end of the article.
Watch Game 1 here on Lolesports.
Draft Phase
In order to understand some of the context around any upcoming miscommunication, we are going to quickly run through the draft that TSM put together, and how we expect them to interact during the game.
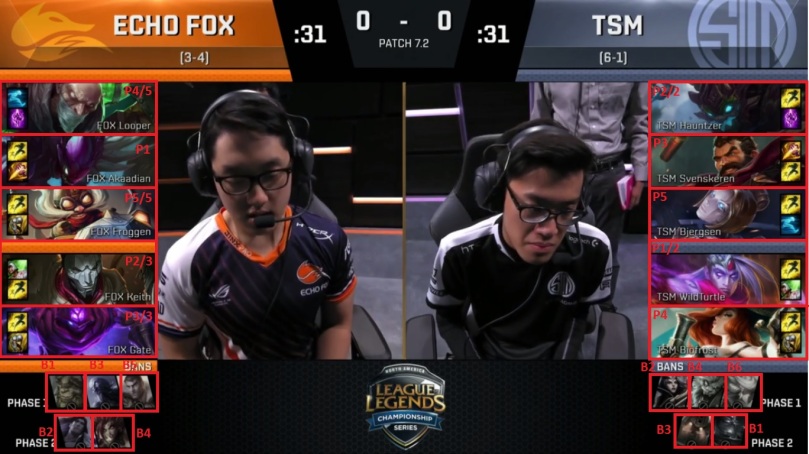
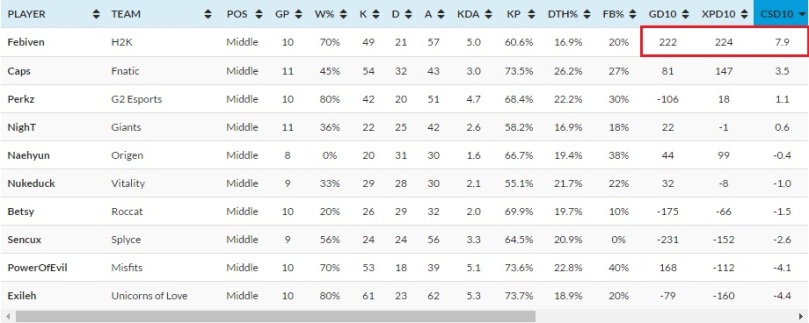
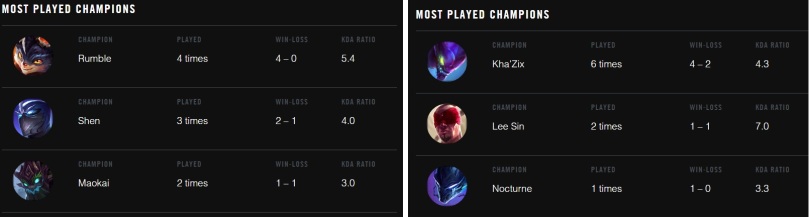
One thing to note is Echo Fox taking the Ivern away with their first ban, meaning TSM either have to ban both Rengar and Kha’zix or accept that they won’t get a top jungle pick. This could also indicate that they aren’t comfortable playing the Graves counter matchup, as although we have Akaadian play Graves, he has a 33.3% winrate overall on the champion, and in his previous matchup against Ivern chose to play Kha’zix instead. The rest of the first ban phase is fairly straightforward with kha’zix coming out as the only top tier jungler remaining, prompting Echo Fox to immediately first pick it, with Akaadian having a 71.4% winrate over 7 games on it. Looking back to the TSM draft we see them grab the Varus, Maokai and Graves in the first rotation, indicating a strong late-game teamfighting composition with Varus for mid-game waveclear and poke. This then prompts the two support bans from Echo Fox, removing the Taric to prevent TSM from combining him with the Maokai and diving them over and over again. Then in the second ban phase we see TSM take the MF support pick as a counter to the Malzahar support, and then the final rotation Orianna to cement their teamfighting composition.
Looking at TSM’s team composition as a whole, we can expect plenty of late game teamfighting ability, Maokai with Orianna ball is going to be the prime candidate for TP flanks into Shockwave plus Graves. The Varus pick plus MF gives them some decent mid-game waveclear and the late game lethality from Varus will shred through the squishier picks of Echo Fox. This style of composition is heavily reliant on synergy and timings, in order to make the full use of cooldowns in these teamfights, a missed Shockwave or wasted TP could severely hinder how TSM is looking to play this game.
Pre-5 Minutes
At 4 minutes we can see a snapshot of how TSM are setting up for success during their early game.
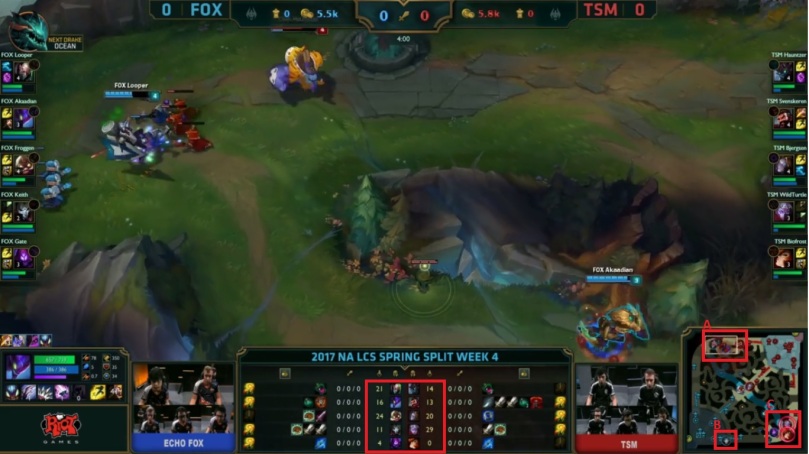
From the above snapshot we can see 3 areas of interest; points A, B and C on the mini-map.
A
Looper has pushed in Hauntzer early on, allowing him to deny some early cs. At this point Akaadian is looking to maybe dive the toplane, however an early ward from Hauntzer, plus Svenskeren recognising that danger, prevents Akaadian either diving or forcing Hauntzer out of lane entirely.
B
Keith has had to take an early back as Jhin and only picked up an extra longsword in the process, on top of already being down 18cs in that matchup. This provides TSM the opportunity to accelerate the Varus mid-game spike.
C
Not only have Turtle and Biofrost developed a cs lead, but they also have the wave shoved under turret, denying Keith a bunch of cs and preventing him from freezing it.
First Blood
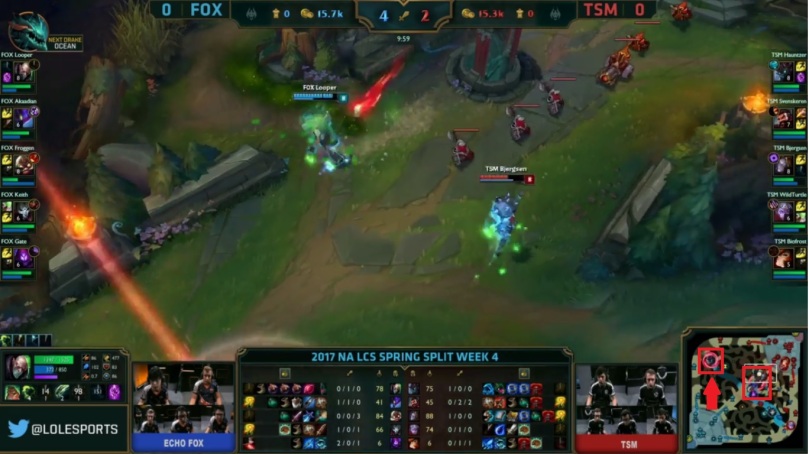
Just after the 5 minute mark we see the first signs of a breakdown in communication from TSM as Svenskeren gives up first blood in the midlane.
You can see the first blood kill here – Sven giving up first blood
At 11 seconds into the clip we see that TSM are trying to shove the midwave under turret. However TSM know that both Akaadian and Froggen have already had their first backs and so will have an item advantage during the next fight. Plus we can see that Bjerg has also used a full spell rotation, and so if a fight was to occur he would be waiting on those cooldowns before being able to fully commit. At exactly 12 seconds into the clip we see the first break in communication, right as Bjerg is already moving back to avoid the Q from Froggen we see Sven move forward to push the wave rather than moving back with Bjerg. This slight misstep, combined with Bjerg still not having his cooldowns means that if Akaadian is around then he can force a fight with Froggen as they are the stronger duo. This is exactly what happens as Akaadian jumps over the raptor pit and is able to make use of that first back by using blue smite to slow Sven and pick him off. Whilst it is difficult to exactly pinpoint why Sven kept walking forwards without listening to their in-game chat, it is fairly safe to assume that he thought he had more support than he did.
However this clip also shows that Echo Fox are also not on the same page, as their botlane ping Biofrost as missing twice before the pick onto Sven, but Akaadian still steps to far forward after killing Sven which allows Bjerg to get the return kill. In fact we see Akaadian begin to turn away right after getting first blood before trying to turn go back in onto Bjerg, despite Biofrost already being there with the exhaust and to prevent the damage from isolation.
This first blood clip identifies that communicating cooldowns and potential cross map plays from other lanes is crucially important, if Sven had known Bjerg was waiting on all cooldowns he may have not stepped up to Q the wave, and if Akaadian had know that Biofrost was immediately roaming on him he may have been more cautious about flashing for the kill on Sven, causing a significantly different outcome to occur.
Botlane Advantage Pre-10
In the next clip we see a misplay from the botlane for TSM, in which they take an extended trade without respecting that Jhin has just hit 6 and has summoner advantage.
First botlane death for TSM – Turtle gives up a kill botlane
At the start of this clip we see Gate come down from the river bush where he had been waiting, and hits a two man silence on both Turtle and Biofrost, leaving MF silenced and so unable to clear out the voidlings with her E. At this point although Keith is still level 5, he knows that he will now hit level 6 first thanks to the recent trades giving him the opportunity to take the lead in xp. And since TSM botlane decide not to back, Keith knows that at the very least he can force summoner spells to be blown from Turtle, as Biofrost is already down his own summoners from earlier trades. Once that level 6 is reached we see great communication from the Echo Fox botlane, Keith immediately begins his ult, whilst Gate steps up to pressure Biofrost to stop him from returning damage directly onto Keith. At this point Turtle is forced to dodge the shots from High Noon as Biofrost does not have flash and is not close enough to block them for him. This actually nets EF a kill, and I’m not overly sure why Turtle doesn’t expend any summoners to avoid dying, he had a reasonable lead on the lane and it seems odd to just give that up to avoid burning his Flash or Heal. In the end it’s more of a misplay on the side of TSM, but there is still a distinct lack of communication between the duo as Biofrost should be moving to block the shots for Turtle the moment that Keith begins his ult, or at the very least be telling Turtle to Flash behind him if he is unable to reach him in time.
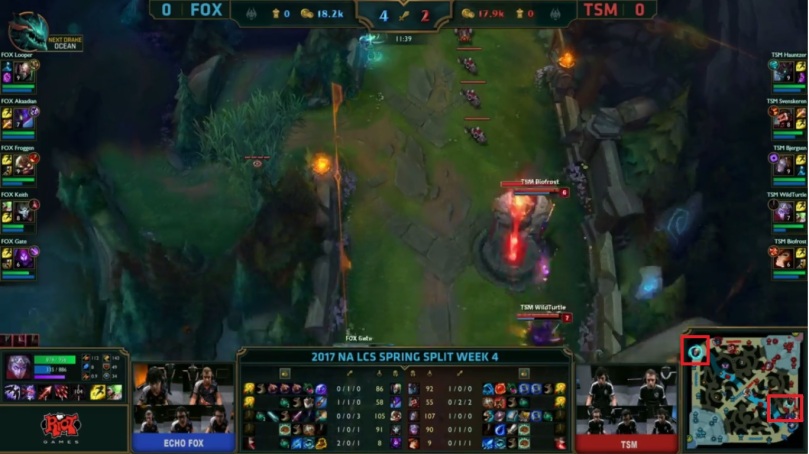
First Corki Roam
Shortly after picking up his first package, we see Froggen looking to make an immediate play. Since they’ve just seen Bjerg shove the wave forward in order to back Echo Fox know that they have a numbers advantage especially with Corki having just picked up his Sheen. Moving to deny the blue buff for Bjerg serves two purpose, reducing his ability to spam his spells in order to waveclear vs the Corki but also looking to make a pick on Sven who will be looking to help Bjerg secure that buff.
The clip can be found here – Double kill in TSM botside Jungle
We first see Corki with his own blue buff able to shove the midlane in order to look for that roam, or at least deny cs to Bjerg if the roam is unsuccessful. Because of their recent kill EF botlane is also free to roam, with Gate being close to 6 as we know that Keith is already 6. This allows Gate to roam into the botside jungle where TSM now have zero pressure and check to see if Sven is at the blue buff. Gate again plays this really well, predicting Sven will dash away the moment he spots the package from Froggen, and hitting his silence negating a lot of the potential return damage from Sven. At this point EF get an easy kill onto Sven, and because Gate is the recipient he hits 6 and immediately ults Biofrost for another kill.
This botside fiasco really sets the tone for most of this game, and the impact that a lack of communication can have. We can see that TSM are not communicating effectively as Sven walks into his botside jungle whilst neither mid or botlane are there to support him, having recently backed. Bjerg see’s that Corki has both blue buff and package plus Sheen and so knows that Froggen will most likely be looking to make a play. TSM even see Corki move botside as he finishes clearing the midlane minion wave, and knowing that they have no vision in either the river or their own jungle they should be moving as a group rather than heading in 1 by 1 to get picked off.
At this point Bjerg should be telling botside to watch for Corki roams towards dragon and blue buff, and if Sven wants to walk into that botside jungle he needs to have both Turtle and Biofrost there with him in order to contest any vision or attempted picks from that Corki package. And whilst we do see Biofrost and Turtle begin to move towards Sven once he has been caught out, it is far too late for them to help and they should immediately back off once Sven has died. What really stands out about this play from EF is that TSM actually spot Gate on a ward moving towards their blue buff, and so they know that both Gate and Corki are able to engage that fight, so why Sven kept walking in without waiting for support is something of a mystery.
This play is also a good example of how the previous miscommunication botlane has a knock-on effect for that side of the map. Now that EF have shoved the wave they are free to start roaming into that botside jungle as they know both Turtle and Biofrost have either just got back to lane or are still in base and so unable to respond to their roaming.
This chain of events then allows for Looper to start proxying toplane, and presenting a window to move through TSM topside jungle in order to make a play onto the midlane. This prompts a TP response from Hauntzer to ensure that EF are unable to dive Bjerg and take the midlane turret.
EF Have TP Advantage
Having forced the TP from Hauntzer, EF are able to shove botlane and make use of the ward they were able to place from their previous catch onto TSM botside. TSM botlane at this point need to ask for Sven to be there, as they know Hauntzer is at a TP disadvantage, and that EF have had plenty of chances to place a ward for him to TP onto.
This play by EF is superbly timed, as they know that TSM will be looking to make a return play, and so they preempt it by having Looper shove the wave and then using his TP advantage to target botlane again as they have a perfect ward from the previous time they caught TSM out.
Keith and Gate start this play by combining their ults to ensure that at least one shots hits Turtle and slows him, at this point Looper completes his TP and is able to just run in and cleanup from there. Because EF have planned this play out well in advance, they are also able to secure dragon as a bonus, as Akaadian is also botside ready to follow up if Sven is there.
Ultimately this play is possible due to continued lack in communication across the whole of TSM. Turtle should have spotted the ward Gate placed during the last skirmish, and knowing that EF have TP advantage should be calling for assistance to avoid a dive, or at the very least be backing off. And whilst EF may have still got dragon and a turret at least they would have avoided handing over extra kill highlighting that more communication between TSM might have made a bad situation a little less worse for themselves.
Ace at 14 minutes
Unbelievably this game is still pre-15 minutes, and EF are once again able to catch TSM split forcing another favourable fight.
Overall teamfight clip – 14 Minute Ace by Echo Fox
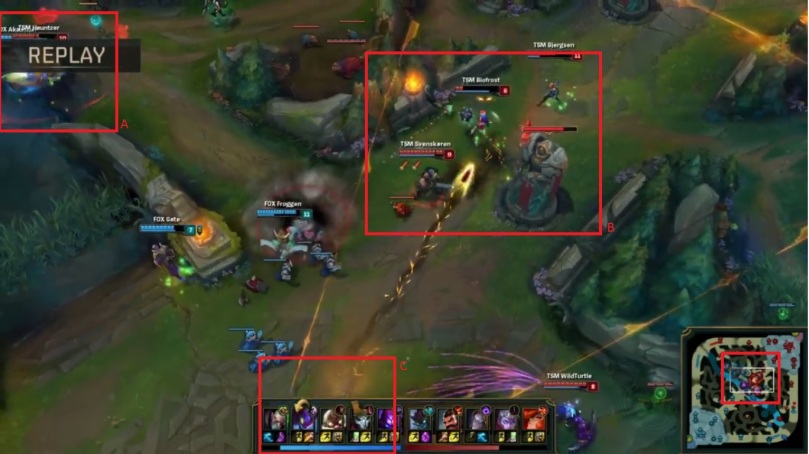
Again we have three key components to this teamfight, and how EF are able to capitalise upon the miscommunication from TSM.
A
Hauntzer has already been forced to ult and is being zoned from the fight by Akaadian, plus we can see Looper already starting to head down to help finish him off. At this point the main method for Bjerg to hit his ultimate is already down, and the primary tank for TSM is unable to enter this fight. Looper’s position also indicates that he is looking to dive the mid T1 turret from behind, and so should TSM stay where they are then Looper is still going to be looking to execute that dive. This part of the teamfight is where the lack of communication for TSM really shines through, as Hauntzer is a key part of how they win their teamfights, and him not being able to enter the fight due to multiple members of EF zoning him realistically loses them this fight outright. At this point TSM should be looking to fall back and minimising their loses as much as possible, and whilst losing that mid turret does open up the map considerably for EF there is no way they can now defend it barring a miracle ult from Bjerg.
B
TSM are still under their turret trying to defend it from being taken despite being zoned by the ult from Keith and although Gate does not have his ult the death of Biofrost means that both Bjerg and Sven on two short range champions have to step up in order to clear out the wave. Once Hauntzer has died Bjerg no longer has a delivery system for his ult, and so there is almost no way that they can defend that turret and so instead they should be looking to move back and make sure that EF cannot push in and take the mid T2.
C
Keith hits the root onto Biofrost and immediately starts his ult in order to not only try and secure the kill but also to force the rest of TSM away from that mid turret. Here we actually see Turtle able to stop the rest of High Noon through ulting Keith and preventing possibly another kill for EF. Because Turtle is off to the side in this fight it is difficult for him to land the relevant poke needed to disuade EF from diving, this means that despite stopping the rest of Keith’s ult he remains ineffective for the remainder of the fight.
Ultimately once Haunzter has been caught the fight is over for TSM, they no longer have a tank and their waveclear is all limited by range. During the whole fight we can see that Hauntzer still has TP, and so there is no reason for him to simply be walking down when there are a number of wards on the right hand bush in midlane that he could TP onto which would enable him to lockdown EF backline.
Conclusions
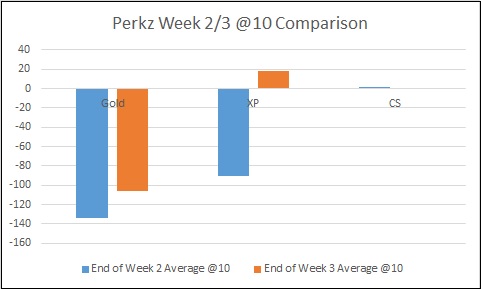
After the 14 minute ace the game is pretty much over, despite a few picks from TSM they are unable to win teamfights due to that early gold deficit caused by miscommunication. This miscommunication in the early game gave EF too many advantages and allowed subsequent plays to be made that snowballed from the kill onto Turtle. Whilst EF played the overall game extremely well, and recognised that they were able to actively make these plays, it was a mixture of poor decision making and lack of communication that meant TSM couldn’t find an answer to stem that early gold advantage.
I should point out that without access to how the teams communicate in-game a number of assumptions have to be made, such as late communication being mistaken for no communication whatsoever. And although Turtle by no means played badly this game, the possible shotcalling provided by Doublelift, alongside him being a more vocal player may help fill the gap that TSM currently seem to suffer from. And so I would not be surprised to see Doublelift return to TSM either fairly soon depending on how badly their next games go, or at the latest by the end of the spring split.
I know this article was a fairly lengthy one, so if you are still here then thanks for toughing it out until the end. I’d like to have embedded the actual video clips rather than just link them, but at the moment that requires an upgraded account and I think it’s a little too early for that yet.
Until next time!